A field guide to validating an address, checking breach exposure, reading a domain's mail security posture, and pivoting from an inbox to the accounts behind it — one investigative step at a time.
Confirm the address is real
Before running deeper checks, figure out whether the address is even plausible. This step exists to weed out typos and obviously fake entries.
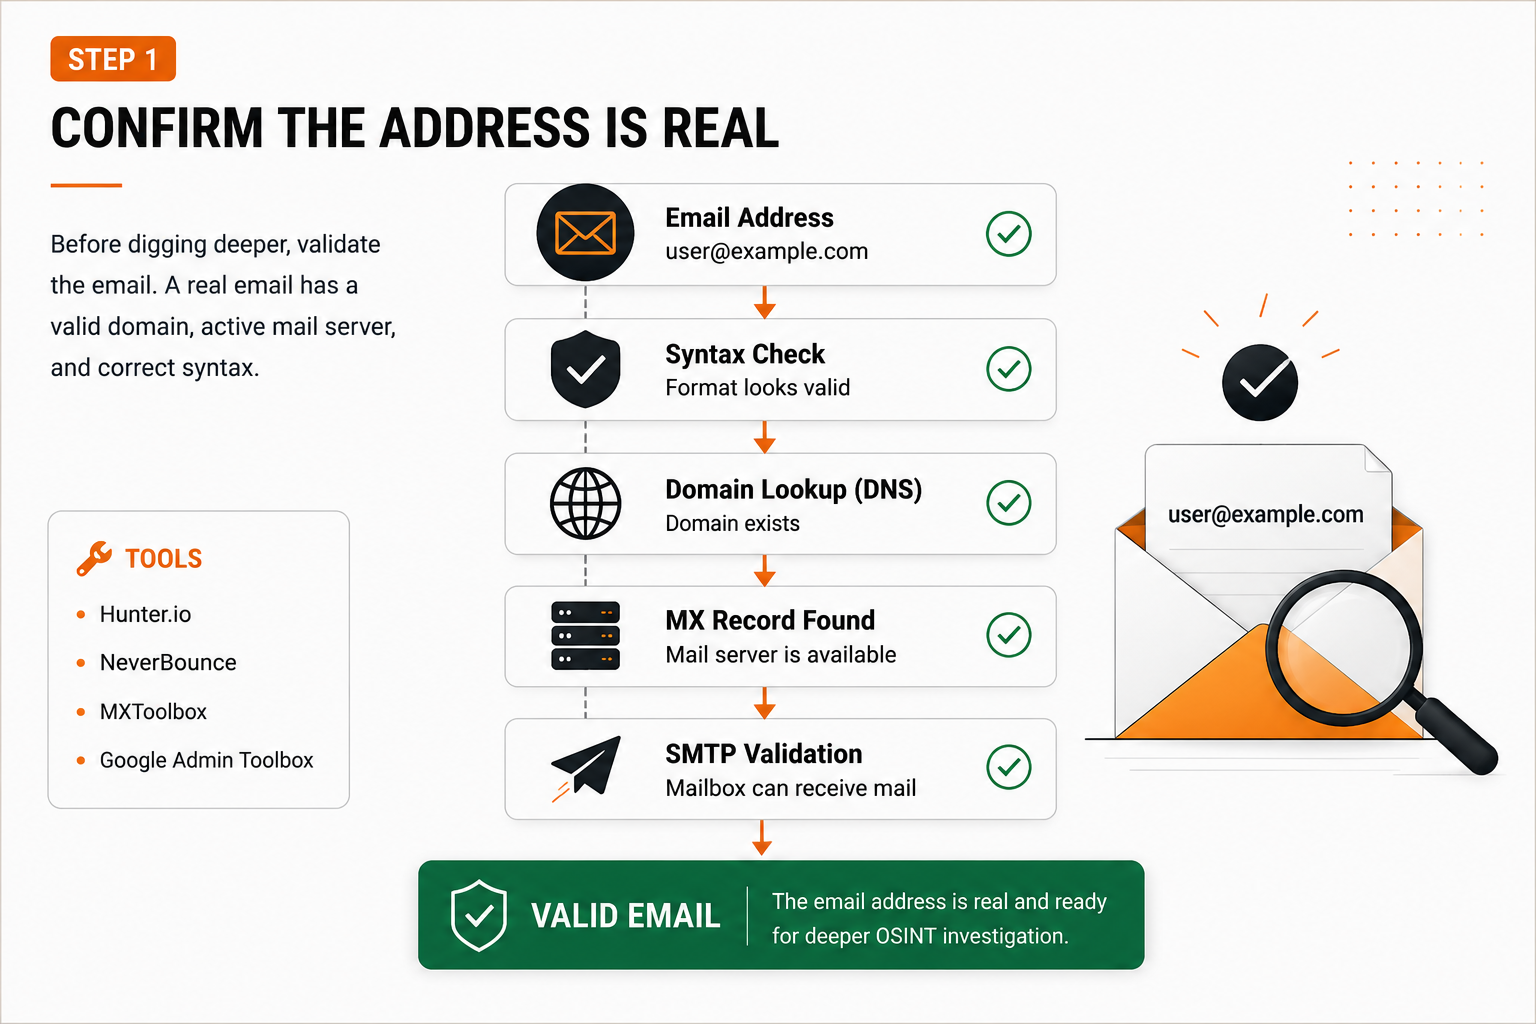
- Format correctness — does it follow local-part@domain structure?
first.last+work@company.comis fine;name@@domainisn't. - Domain resolution — query DNS for A/AAAA records. No resolution at all is a strong signal something's off.
- Mail exchanger records — pull the MX entries. A missing MX record is worth flagging even if mail can technically still land via an A record.
- Careful SMTP handshake testing — with explicit authorization, open a connection and send
EHLOthenRCPT TO:<address>to see how the server responds. Keep volume low, test only what you're allowed to. - Throwaway or generic addresses — is the domain a known temporary-inbox service, or the local-part a shared role account like
support@?
End of this stage: a rough confidence call — real, fake, or uncertain.
Look for breach history
With a plausible address confirmed, the next question is whether it's turned up in any exposed dataset.
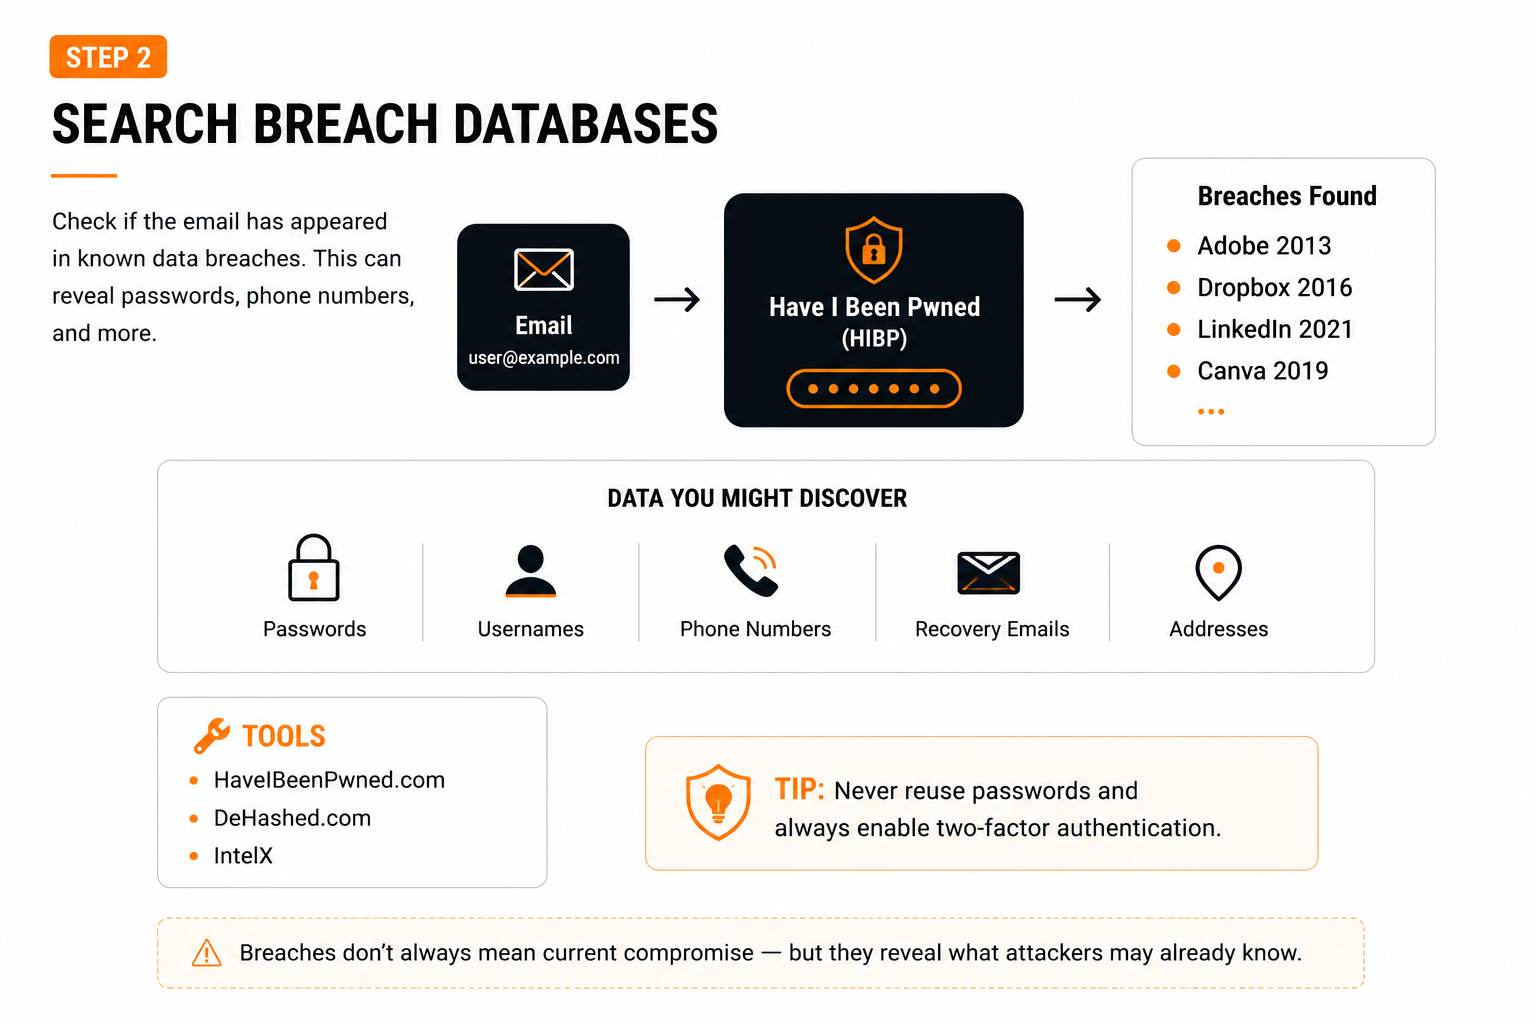
- Breach lookups — query a reputable breach-checking tool or API for platform, exposure date, and leaked data types.
- Weighing severity — an old breach exposing only a username is far less serious than a recent one with live passwords and personal details.
- Reused-password exposure — Reused-password exposure significantly increases risk, because any plaintext or easily crackable password is likely to be tried on other accounts using the same email — which is exactly what drives credential stuffing attacks.
- Lining up dates — cross-reference breach timestamps against anything else you know: odd login alerts, forced resets, lockouts.
Read the MX records
MX records point to where a domain's mail actually lands, and they quietly reveal a lot about the underlying infrastructure.
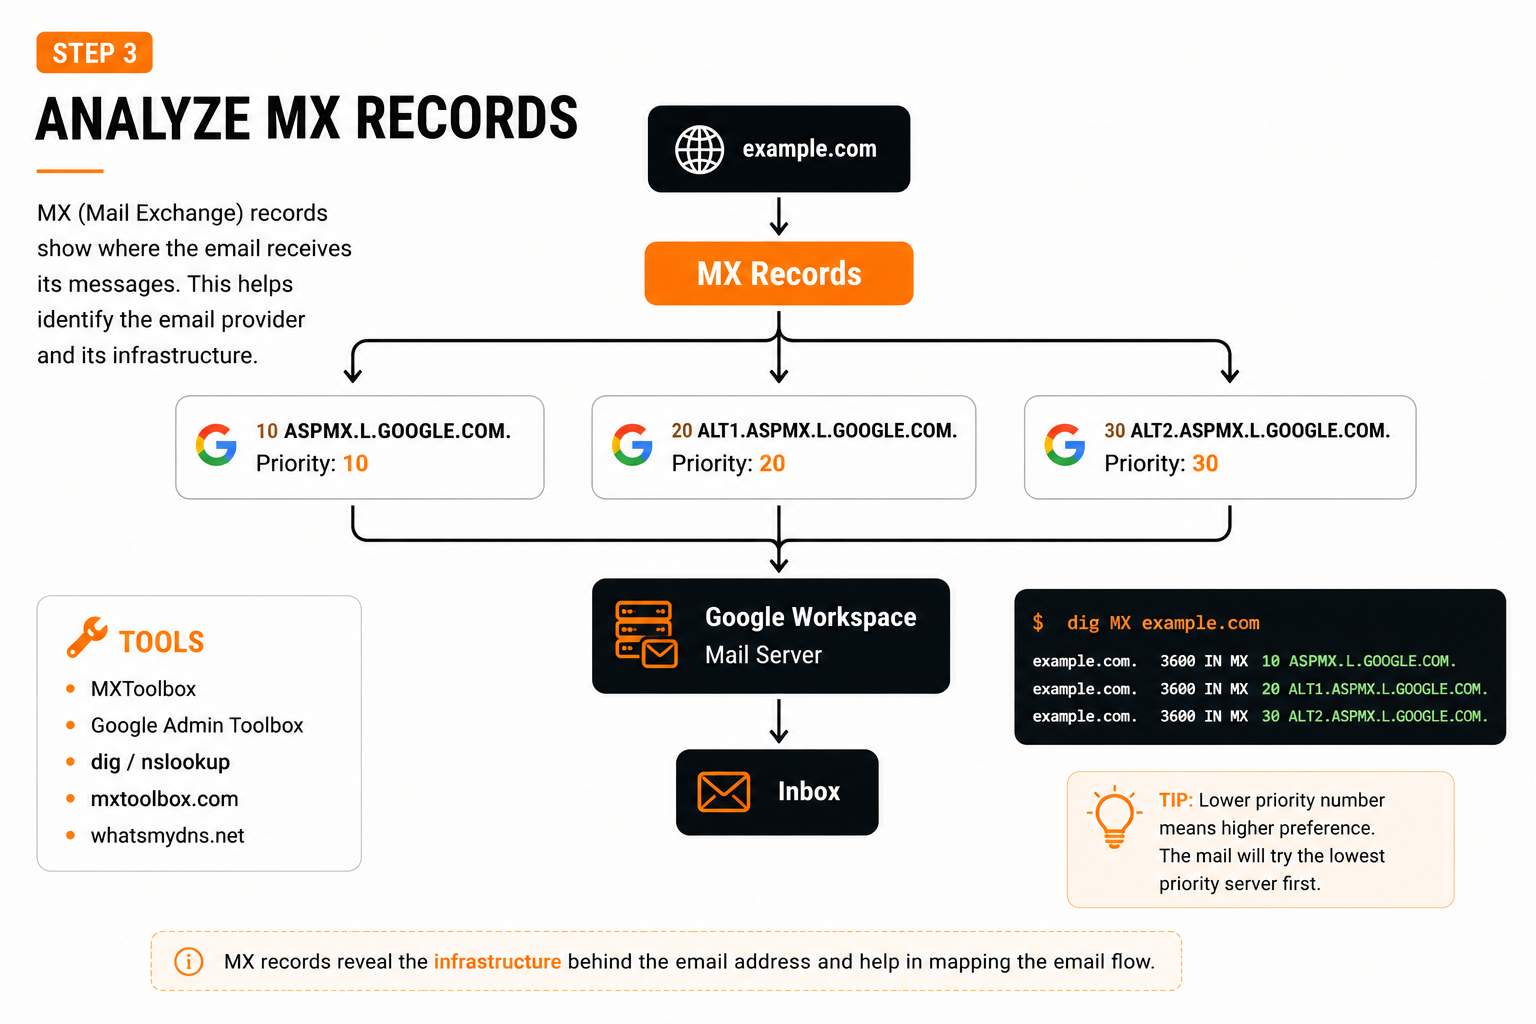
;; ANSWER SECTION:
example.com. 3600 IN MX 10 mail1.provider.net.
example.com. 3600 IN MX 20 mail2.provider.net.
- Hosting choices — a major cloud provider, self-managed server, or dedicated security gateway.
- Failover design — multiple priorities mean a backup plan; one lone entry is a single point of failure.
- Configuration slip-ups — records pointing at hosts that don't resolve, or (with authorization) outdated mail software.
Check SPF, DKIM, and DMARC
These three DNS-based mechanisms are what stop attackers from freely spoofing a domain's mail — and all three are publicly queryable, making them a fast read on how seriously an organization treats email security.
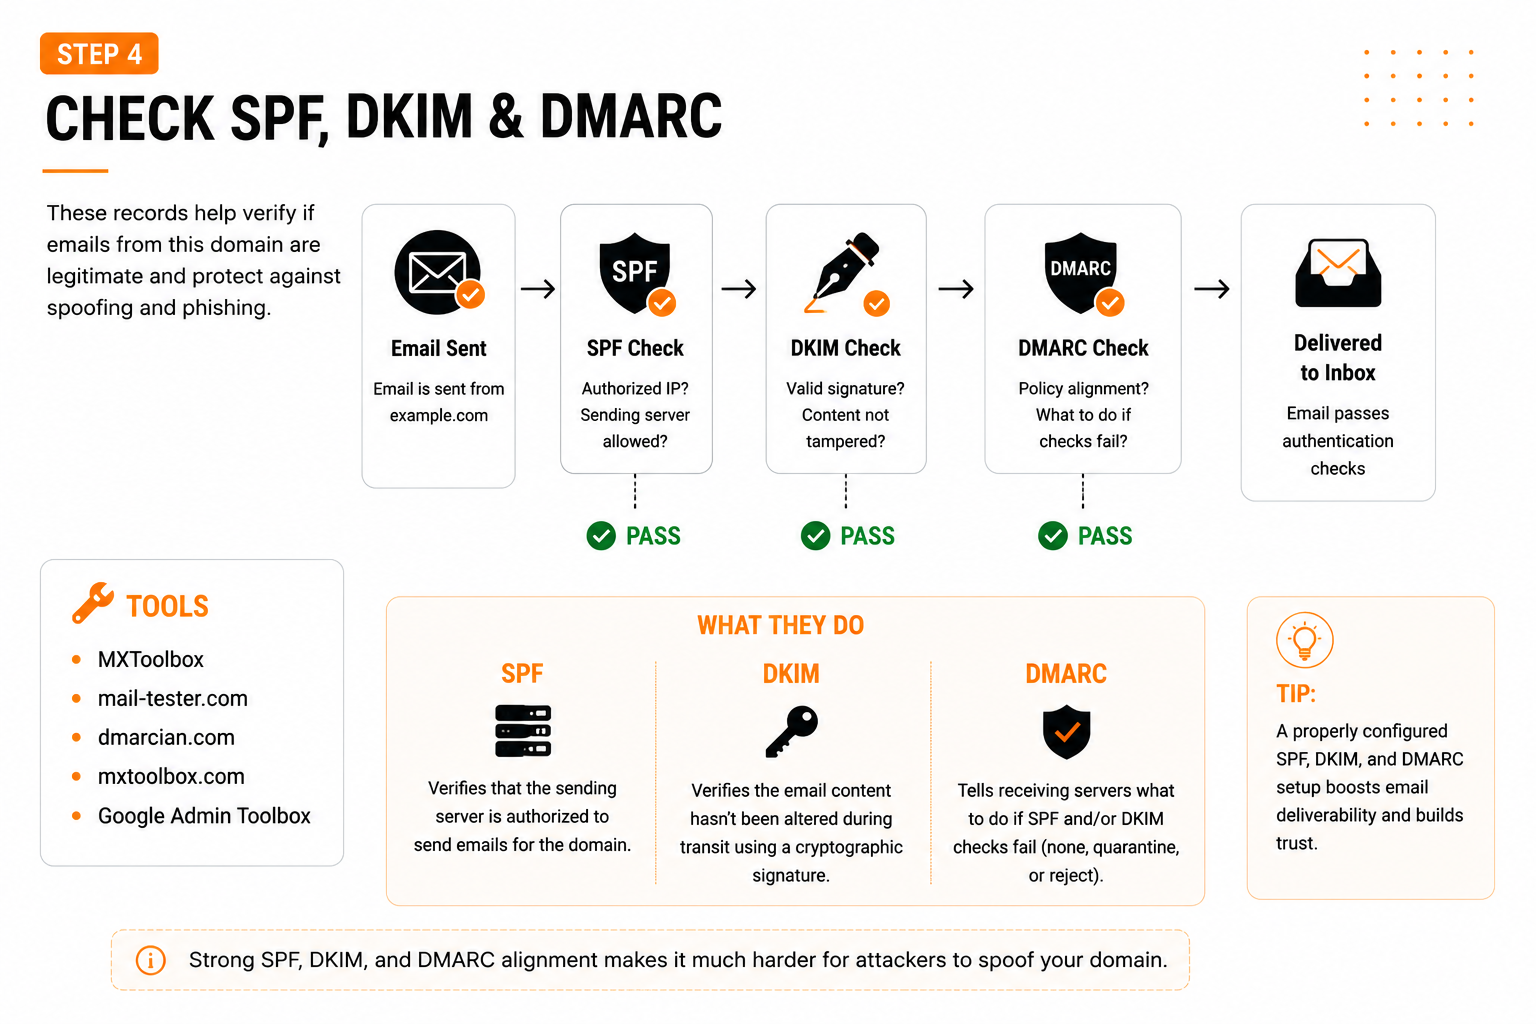
SPF — who's allowed to send
"v=spf1 ip4:203.0.113.5 include:vendor.com -all"
-all hard-fails anything unlisted; ~all only flags it as suspicious. A loose SPF setup leaves the door open for spoofing.
DKIM — proving the message wasn't altered
A public key sits in a TXT record at a path like selector._domainkey.example.com; incoming mail carries a DKIM-Signature header. A valid signature confirms the content wasn't tampered with and the sender holds the domain's private key.
DMARC — what happens on failure
p=none
Observe only, take no action
p=quarantine
Route failures to spam
p=reject
Drop failing messages outright
A domain running p=reject with proper alignment is actively defending against impersonation — that makes spoofed phishing campaigns much harder to pull off.
Use Gravatar as a pivot point
Gravatar links an email address to a profile photo — and plenty of older sites, forums, and comment sections still pull from it automatically.
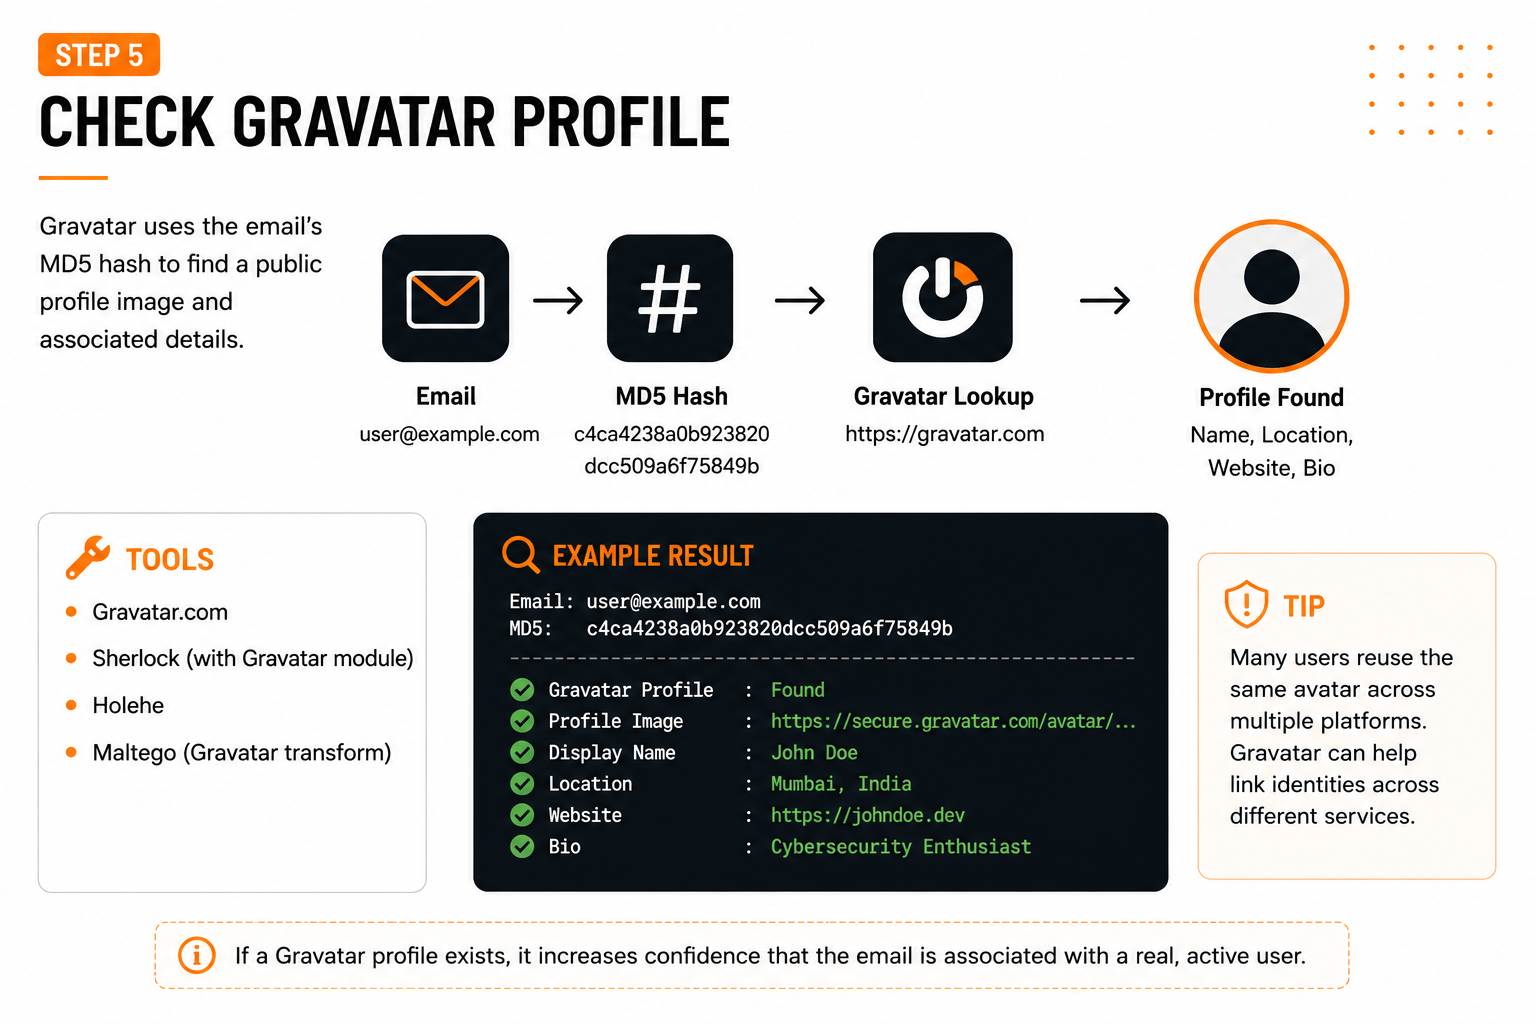
- Normalize the address — lowercase, no extra whitespace.
- Hash it with MD5.
- Query Gravatar's lookup with that hash to see if a profile comes back.
On its own, a Gravatar hit isn't conclusive — but paired with a matching photo or username pattern elsewhere, it becomes solid corroborating evidence.
Generate probable usernames
Most people reuse a small set of naming habits across every platform they join — which makes username prediction one of the more productive steps in the whole process.
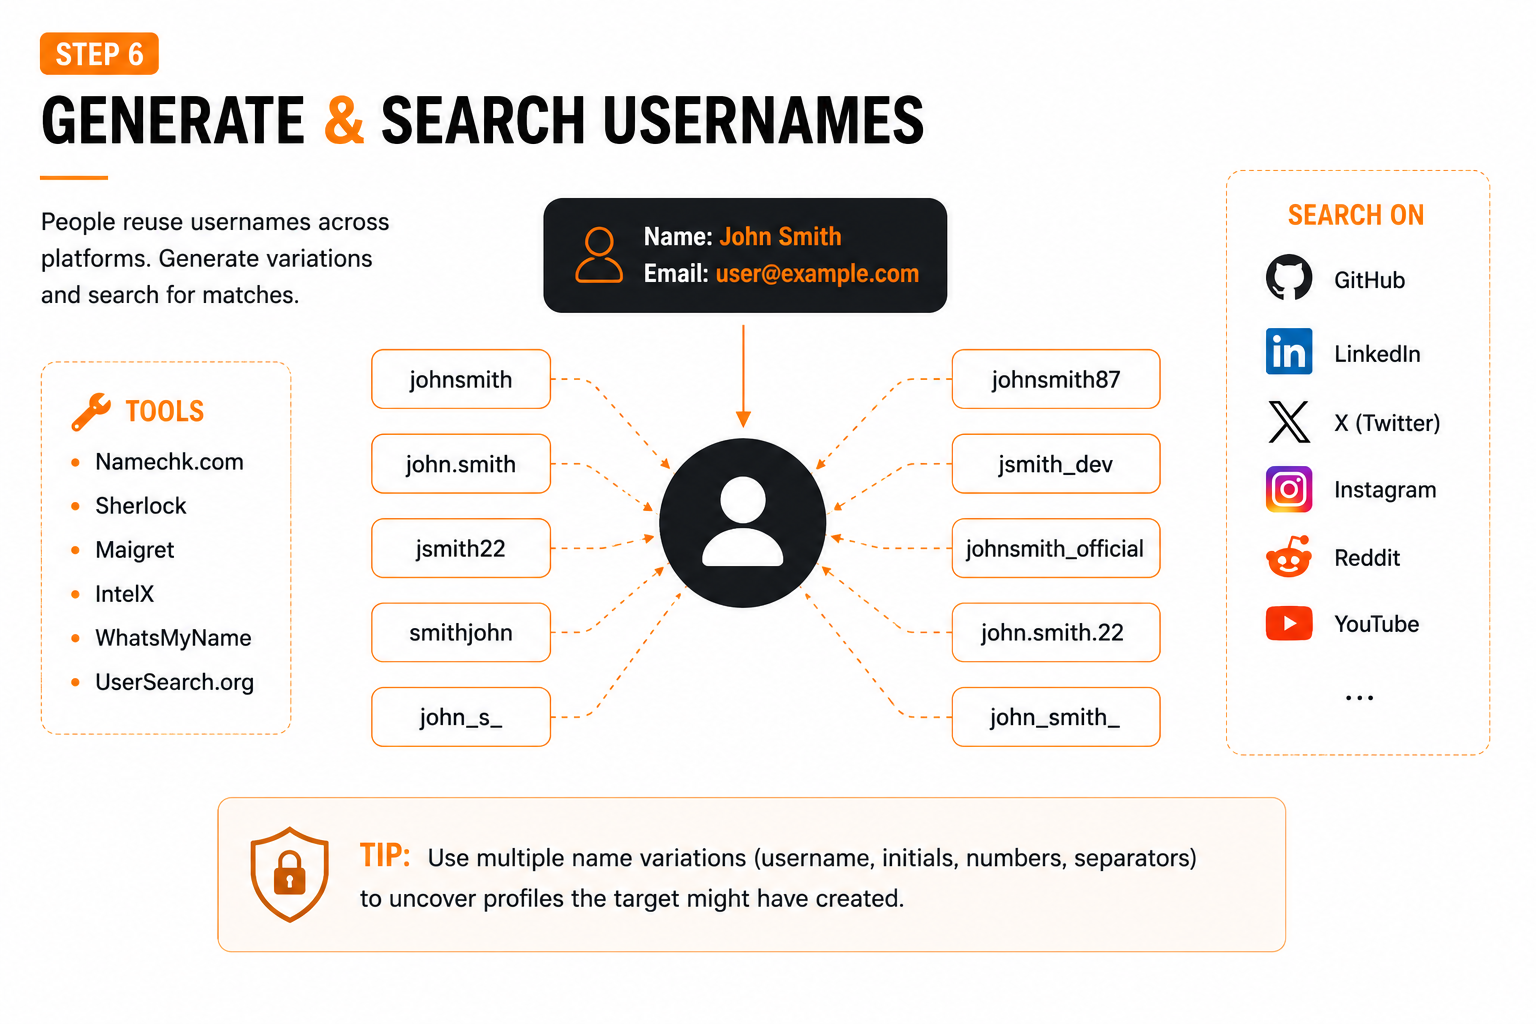
Starting point: a name like Aditi Sharma
- Name combinations: first + last initial, initial + surname, full name concatenated
- Numeric additions: birth year, favorite numbers, sequential digits
- Contextual tags: profession or hobby appended
- Separator variations: dots, underscores, hyphens
Then check the candidate list manually against GitHub, LinkedIn, X, Instagram, and Stack Overflow — confirming real matches with photos, bios, and linked sites, not just handle availability.
Bring the workflow together
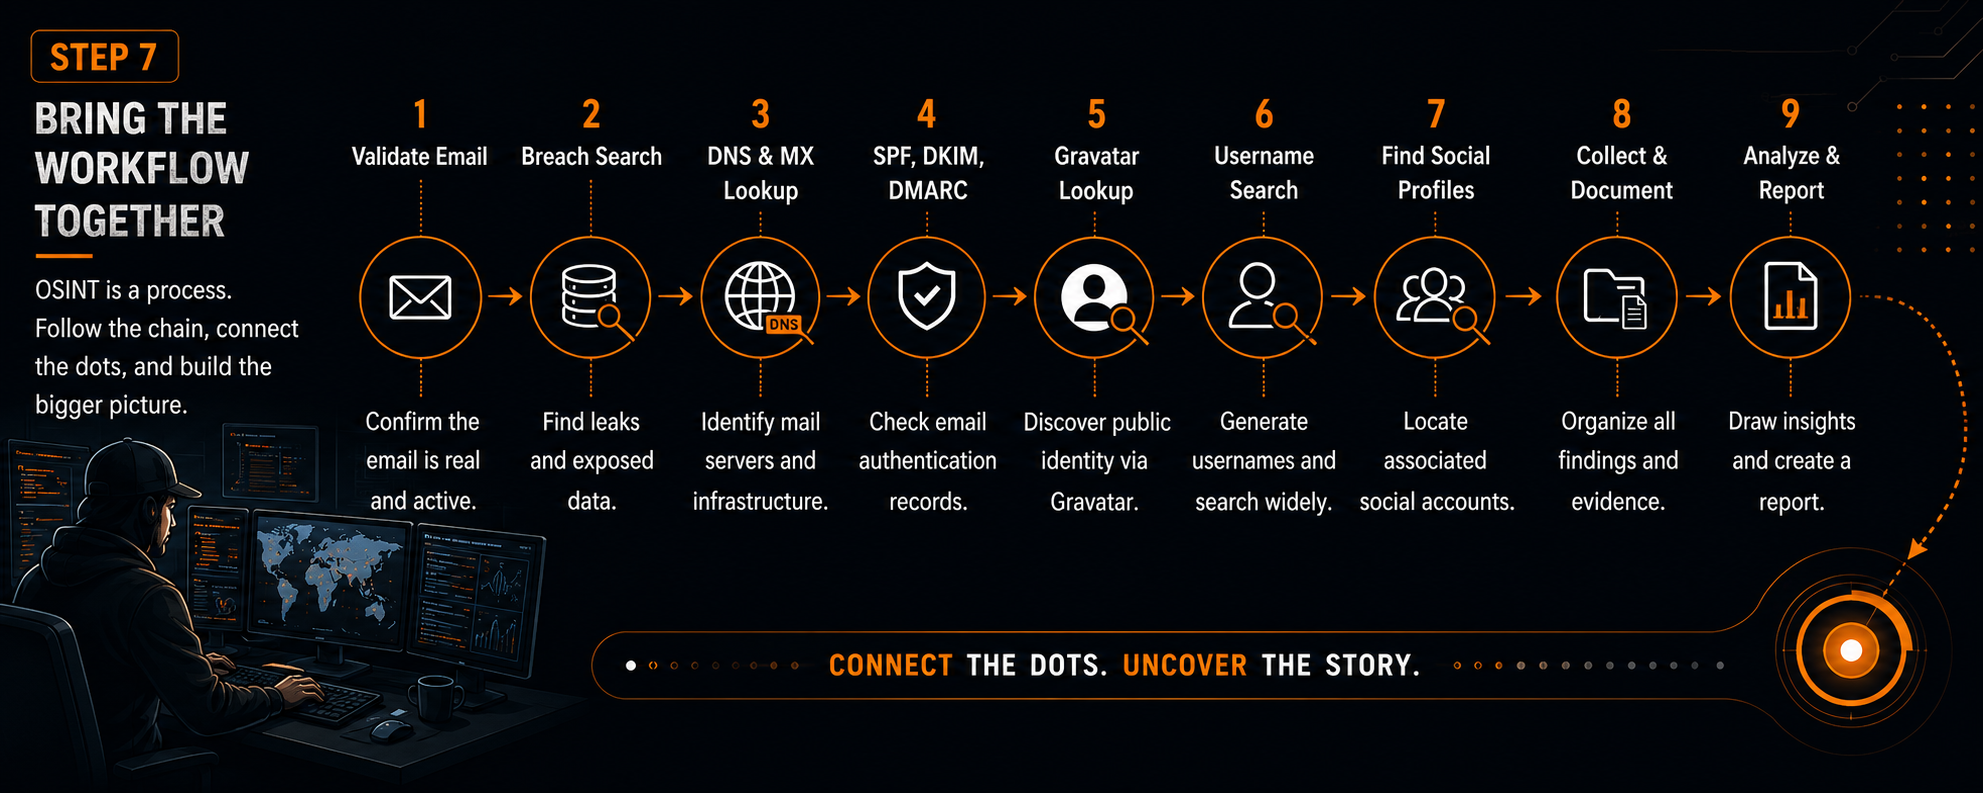
- Validate the address — syntax, DNS resolution, MX presence
- Search breach records — where, when, what type of data leaked
- Assess mail security posture — SPF, DKIM, DMARC
- Check Gravatar — name, image, or bio it surfaces
- Build and test usernames from whatever clues you've gathered
- Connect the dots — email → breaches → usernames → profiles → infrastructure
- Write it up — exposure level, likely identities, security posture, recommended fixes
Defensive lessons worth remembering
For individuals
- Use a password manager and a unique password per site
- Enable multi-factor authentication everywhere it's offered
- Avoid one email for every account — adding aliases creates separation between accounts.
- Periodically check whether your address has surfaced in a breach dataset
For organizations
- Keep SPF, DKIM, and DMARC configured — work toward
p=rejectonce confident - Audit MX records and retire outdated mail infrastructure
- Watch for leaked corporate credentials; enforce strong password and MFA policy
- Train staff to recognize phishing that exploits weak email configuration
A safe way to practice this
- Spin up a low-cost test domain with basic mail hosting
- Publish your own SPF, DKIM, and DMARC records, then send test mail and watch how different providers score it
- Simulate a “breach” in a closed lab so you can safely observe what exposed data actually looks like in a dump.
- Run the username-generation process on your own handles to see it from a defender's view
Building this muscle memory translates directly into roles like SOC analyst, threat hunter, or security researcher.